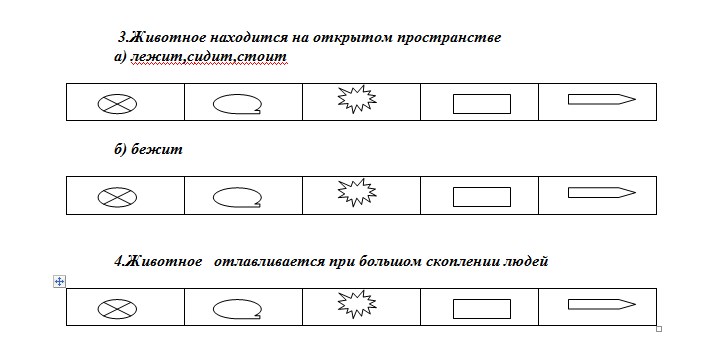
1. What is Dog Control?
In Ukraine, as in other countries of the former USSR, the concept of “dog control” is not familiar to the public. Most often, we deal with stray animal catchers.
In Ukraine, and possibly in other former USSR countries, there is a rather strange situation where veterinarians show little interest in stray animals, and the police have simply lost interest. The only agency dealing with stray animals, specifically their capture, is the Municipal Services Department, which forms sanitary patrols to catch stray animals based on the Municipal Utility Enterprise (KATP). However, there are more progressive ideas: for example, in Tatarstan, an ecological police force was created, whose functions include control over stray animals.
In the United Kingdom, stray animals are managed by dog control services under municipalities, the police, and animal protection charities. This is a well-established system where everyone has their defined responsibilities.
The experience of the UK and other Western European countries shows the fundamental importance of an organization such as DOG CONTROL. The control staff must be selected considering their experience, ability to understand animals, and personal qualities. They should be seen not as killers, but as specialists performing a responsible task of fostering the proper attitude toward animals and their care. Therefore, it is very important that random people are not allowed into control positions.
To radically change the meaning of this work, the goals and techniques of capturing must first be changed to make them more humane. The most valuable qualities are an understanding of animal behavior and personal patience.
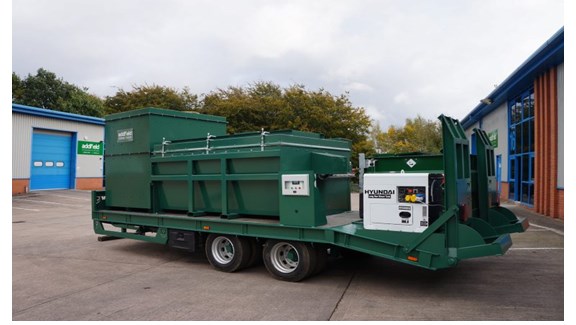
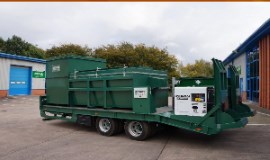
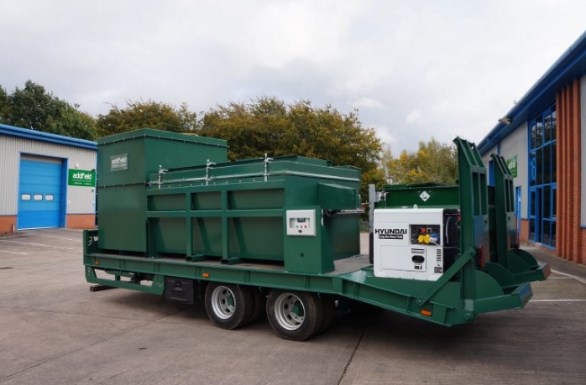
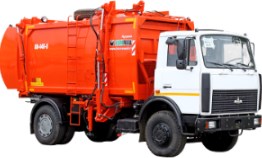
Dog control representatives must be well-equipped. They should have at their disposal a specialized vehicle with catching equipment and everything necessary to provide assistance to animals in case of accidents.
When catching aggressive animals, special protective suits should be worn, with particular attention paid to protecting the head, limbs, and vulnerable body parts.
A dog control team consists of 1-2 persons. Incidentally, in Western countries, there is also a standard rate of captures per hour — 4-10 dogs depending on the situation. Instructions given to dog control specialists include advice like: “If you were unable to catch a dog today, don’t be discouraged; maybe tomorrow you will have better luck.”
In reality, dog control workers who are not paid per capture tend to treat stray animals quite gently and with understanding.
To become a dog control worker, the following requirements must be met:
-
Ability to handle animals and knowledge of their behavior
-
Ability to work with the public, explaining the importance of their work
-
Knowledge of the main laws regulating dog control activities
-
A valid driver’s license
-
Ability to make quick and independent decisions
-
Willingness to work at any time of day
-
Ability to communicate information orally and in writing
Educational requirements are also important — education must be at least secondary. Workers should have experience in teaching or lecturing. Among dog control specialists in Western countries, you can find cynologists, veterinarians, retired military personnel, police officers, and trainers.
The duties of dog control workers are quite varied:
-
Catching and controlling stray animals, including temporary sheltering for 7 days in municipal shelters
-
Educational activities — informing the public about existing rules for animal care and walking, explaining conditions of fines; special attention is paid to school presentations
-
Responding to public complaints (pollution of recreational areas, unjustified dog barking, attacks on people), including preparing legal claims
-
Monitoring compliance with adopted decisions and current laws
2. To Catch or Not to Catch
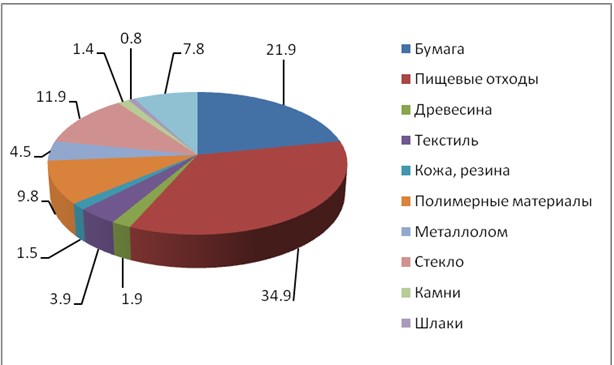
Probably no one has counted the number of dogs living in our country. It’s quite a difficult task. However, there is a generally accepted method for calculating the number of dogs per capita. According to this method, in the USA, there is 1 dog per 10 people, while in Western Europe there is 1 dog per 6 people.
In Ukraine, this ratio is somewhat higher, since stray dogs make up 60-70% of this number. According to our data, about 10 million stray dogs live in Ukraine.
What is a “stray dog”?
-
A lost dog. Usually a pet, such a dog can be quite aggressive out of fear of unfamiliar surroundings;
-
A stolen dog that was later abandoned as unwanted;
-
An old, often sick dog abandoned by its owners, which often carries various diseases;
-
A genetically stray dog living in packs, showing traits of their wild ancestors — wolves. Usually, this type of stray animals causes the biggest problems in populated areas and is the most dangerous to humans;
-
Dogs that owners let out unsupervised due to lack of time or busy schedules. These dogs usually return home themselves after wandering but often cause traffic accidents.
It is usually quite difficult to distinguish a pet dog from a stray, especially if it has no collar. Today’s pet dogs become strays when their owners cannot feed them or when dogs get sick or old. Even dogs of prestigious breeds can become strays: German Shepherds, Collies, Terriers, Schnauzers, Afghan Hounds, etc.
The dog-keeping situation is also complicated by the fact that cities usually lack special places for walking and training dogs, while streets, parks, and squares are practically littered with animals. There are no local laws obliging dog owners to clean up after their pets.
This sweet couple,
along with their children,
and their children’s children,
could have born during their lifetime:
Year 1: 16
Year 2: 128
Year 3: 512
Year 4: 2,048
Year 5: 12,288
Year 6: 67,000
adorable puppies
Therefore, the dream of many city officials to exterminate ALL stray animals must be recognized as utopian. A person can only attempt to establish an ecological balance in a particular city. Incidentally, according to Indian experts—who are no less concerned than we are about the growing number of stray animals in India—intensive extermination of stray animals has led to a sharp increase in the rat population.
We are so obsessed with the idea of exterminating all stray animals in the city that we have already forgotten what exactly bothers us about them.
What bothers us are stray dogs wandering and lying on the city’s main streets or attacking passersby, children, and joggers (domestic dogs can be no less dangerous for the latter).
We are disturbed by cats howling and dogs barking in our yards at night.
We dislike the sight of stairwells, yards, and city parks littered with dog and cat waste, and playgrounds fouled by them become hazardous to the health and lives of our children (in a city with a population of 500,000, dogs leave over 12 tons of feces daily).
We are worried about sick stray dogs and cats — carriers of numerous diseases dangerous to humans.
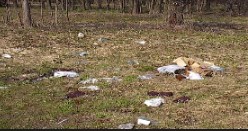
Finally, the sight of bloated animal carcasses on the roadside is unpleasant.
These are the problems we must primarily focus on. However, here is a list of tasks that NO ONE today is able to accomplish:
-
Exterminate all stray animals in the city.
-
Convince all dog owners to walk their pets in designated areas and clean up after them (unless the local government adopts relevant regulations).
-
Respond to every call reporting that a dog attacked someone at a certain location some time ago—simply because the dog is no longer there.
-
Work without the support of laws, police, and veterinary services.
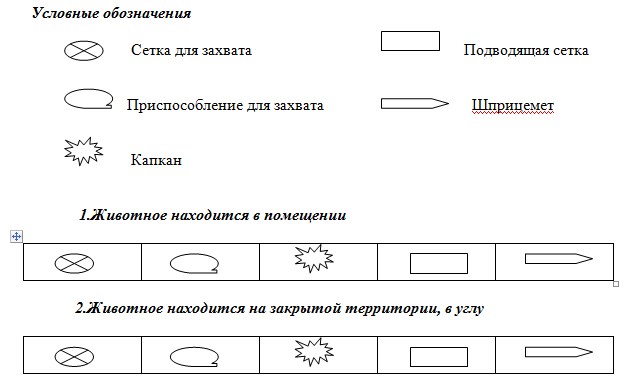
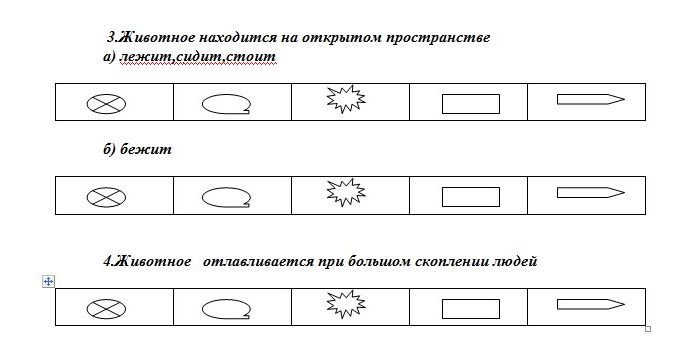
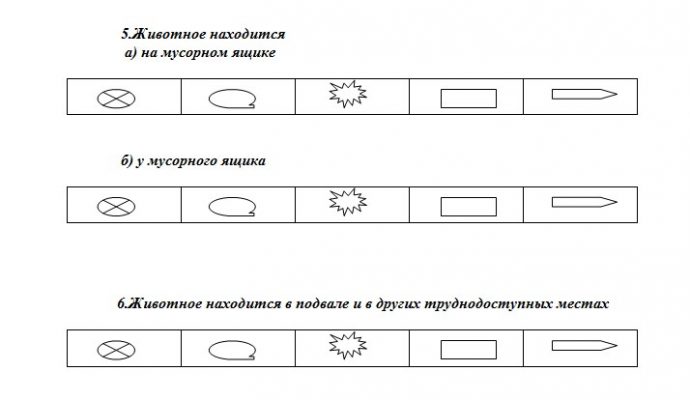
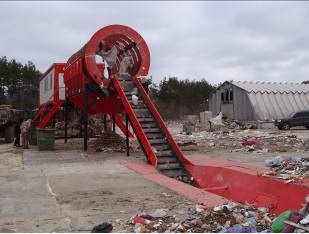
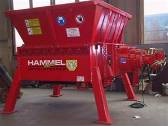
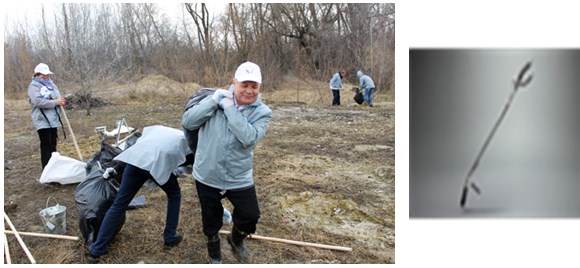
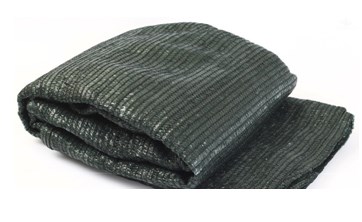
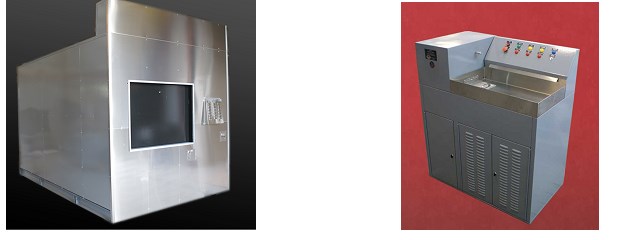
3. Veterinary and other equipment for controlling stray animals
4. Reminder for stray animal catchers
a) How to catch a dog
The main task is to calm the dog and gain its trust.
-
Approach the dog slowly, without sudden movements.
-
Speak to the dog in a calm voice.
-
Offer it to sniff the back of your hand if it’s safe.
-
Give the dog bait.
-
Touch and pet the dog.
-
If the dog has a collar, hold it and attach a leash.
-
If no collar, try to slip a loop over the dog’s head.
-
Make sure the loop is not too large.
-
Pull the dog by the leash and try giving commands.
-
Use animal capture and control devices.
-
A female dog in heat can be used to help catch a male dog.
-
Corner the animal to limit its movement.
-
Use protective gear and do not refuse help from a partner.
-
If you don’t catch it this time, maybe you’ll have better luck the next day.
What to do if attacked by an aggressive dog
-
Face the dog so you can see the attack direction and protect yourself.
-
Use any object to shield yourself from the dog’s teeth (stick, bag, newspaper, box, umbrella, coat wrapped around your arm).
-
If nothing else is available, put your hand under the bite.
-
Do not let the dog attack your legs because if you fall, it will attack your head and neck.
-
If the dog is large and heavy, brace yourself to absorb the first blow.
-
If the dog bites and hangs on you, try to:
-
If the dog bites and then releases you, try to remember the dog’s and owner’s features (if present).
-
Remember the place where the attack happened.
-
Seek medical attention immediately.
3. How to behave with an aggressive dog
-
Do not approach the dog closely.
-
Do not corner it; leave it an escape route.
-
Avoid sudden movements.
-
Leave the territory the dog considers its own.
-
Back away without turning your back on the dog.
-
Keep the dog in your sight at all times.
-
Never look a dog directly in the eyes; this can be perceived as a challenge.
-
Do not provoke the dog by shouting.
-
Do not wave your arms suddenly.
-
If you have taken something belonging to the dog (bone, food bowl), put it back.
-
If there is a door, use it as a barrier.
-
The dog will lose interest if you leave its territory.
-
Ask the owner (if present) to calm their dog.
4. Handling a dog
-
Observe the dog for a few minutes. If there is no obvious threat, sit nearby and talk to the dog in a friendly tone. Be patient.
-
Look around and decide where the dog might run if scared. Determine if there is a place more suitable for capture nearby (road, river, etc.).
-
Approach slowly. If the dog tries to run away, stop.
-
Bait may help, but stressed dogs rarely eat in unfamiliar places.
-
Use a leash or loop. Avoid direct eye contact and do not lose sight of the dog’s head.
-
When caught, put the dog in a vehicle.
-
Keep in mind that small and medium dogs usually attack legs. Use dense material or a net to catch the dog.
-
If alone, use any available object for protection.
5. Work in the city
-
Wear a white coat; have a spare one.
-
Carry an identification badge “VETERINARY CONTROL” to explain your actions to locals.
-
Actively use sound or gas spray to scare dogs during mass city events.
-
After using syringe guns, monitor the animal’s movement because the drug’s effect is not immediate.
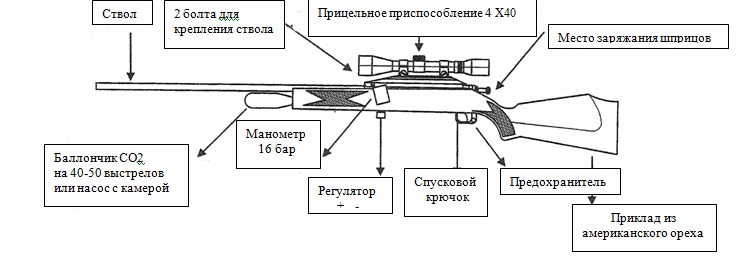
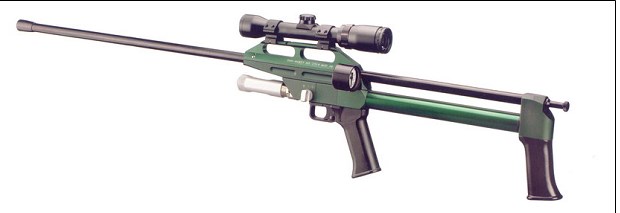
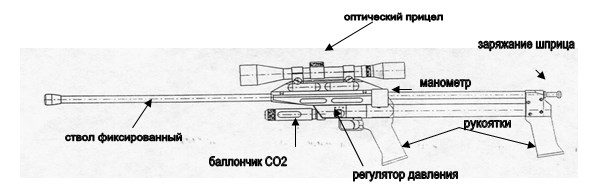
5.1 Syringe guns
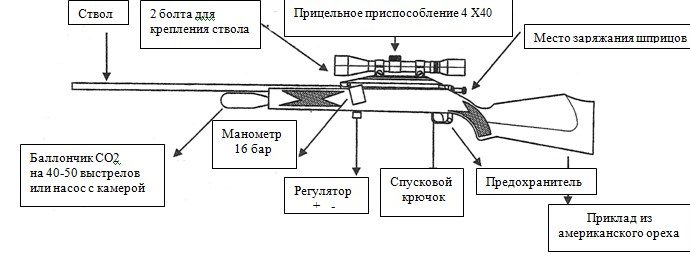
The proposed syringe guns allow treating or sedating animals at distances from 1 to 60 meters with “flying” syringes.
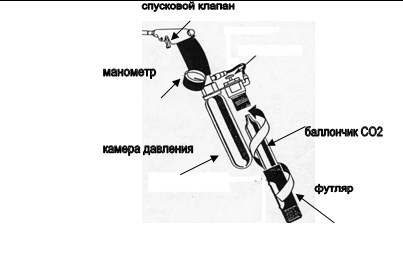
Syringe guns are safe for both humans and animals. They operate on pneumatics or CO₂ cartridges.
Syringe guns have been effectively used in our country for several years. When purchasing a syringe gun, it is recommended to inform law enforcement that this equipment is for sanitary city cleaning and to provide them with the manufacturer’s certificate (included).
5.2 General recommendations for use
-
Due to the low speed of the syringe, avoid shooting at moving animals to prevent missing.
-
Aim for the neck or thigh muscles, avoiding bones that might block the needle.
-
Do not shoot at the head, throat, or abdomen as the drug effect decreases when entering body cavities.
-
Avoid shooting when the animal is in an awkward position or at an angle.
-
Always consider your syringe gun’s effective range.
-
Approach the animal carefully, preferably by car.
-
For accurate shots, avoid strong wind and keep the distance as short as possible.
-
Keep the animal in sight until it collapses; do not approach until the drug takes effect.
-
Simple needles can be removed easily; to remove a harpoon needle, pull the skin away from the harpoon side and pull the needle out.
Syringe Guns Models I.M., J.M., JM.DB
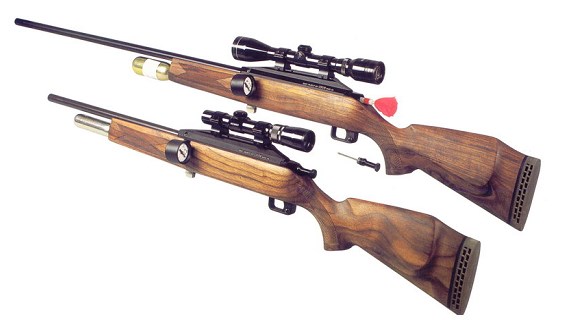
Syringe guns can be supplied in two options:
When supplied in a transport case, the syringe gun is ready for use, and the sighting device is pre-centered. When supplied in a cardboard box, the barrel needs to be attached. The barrel is fastened to the base with two bolts using the included L-shaped screwdriver. In this case, the sighting device must be centered.
All components of the syringe gun are made of blued aluminum and brass. All parts are resistant to weather conditions.
Syringe Gun J.M.
A) Zeroing (Sight Adjustment)
Attention! The syringe gun is zeroed before shipment from Denmark at temperatures ranging from -5°C to +20°C. A pressure of 6 bar for the I.M. model is sufficient to achieve a shooting range up to 20 meters using a 3 ml syringe filled with 3 ml of water.
For zeroing, do not fill the syringe with air; filling it with water is sufficient. Install a training needle using pliers. Use only new syringes for zeroing. Remember to remove the water from the syringe after completing the zeroing process.
Before use, it is recommended to check all syringes. To do this, insert the syringe from the breech side of the syringe gun (the syringe loading area), since this part has the narrowest channel in the barrel, and make sure the syringe moves freely there.
Since the barrel is made of blued aluminum and bronze, there is no need to wipe it with gun oil, as this may reduce the syringe’s exit velocity.
Zeroing should be performed in a location sheltered from wind.
Prepare a zeroing target made from a mattress, a pile of newspapers, a piece of soft rubber, etc., and place it at a distance of 20 meters.
Draw a red circle with a diameter of 2 cm on the target.
Fill the syringe with plain water. Attach a new needle (only new ones!).
Zeroing Table
(for 3 ml syringe)
(Here you can add the corresponding zeroing table if you want.)

B) Sight Adjustment
Remove both caps. The top screw of the sight device controls vertical adjustment, while the side screw controls horizontal adjustment. Each new turn of the screw is fixed by a click — ranging from 5 to 10 clicks per adjustment.
Syringe Gun J.M.
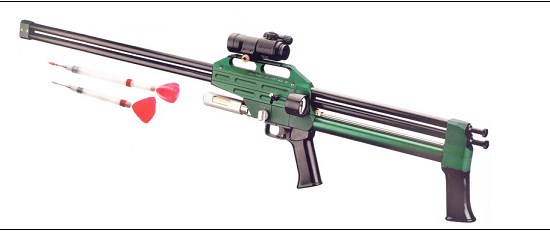
This Syringe Gun
is a modification of the JM model.
It is the only pneumatic double-barreled weapon model in the world.
It comes with two barrels, 11 mm and 13 mm in diameter.
This technical solution facilitates switching from the 11 mm barrel (for 1.5 ml and 3.0 ml syringes) to the 13 mm barrel (for 5.0 ml and 10.0 ml syringes).
No sight adjustment is required when changing barrels.
It helps determine the necessary dose of the administered drug on site.
Upon customer request, it can be supplied with two barrels of the same caliber.
C) Loading the Syringe Gun
Connecting Power Sources
Pneumatic syringe guns can operate either from CO₂ cartridges or from a foot pump.
CO₂ Cartridge:
-
Screw on by hand counterclockwise without effort or tools.
-
When piercing the neck, a characteristic hissing sound appears.
-
After use, unscrew a few turns clockwise to release air, then unscrew completely.
-
The pressure regulator (+/-) should be checked periodically.
Foot Pump:
-
Use a special socket wrench to unscrew the locking ring.
-
Screw on the pressure chamber (if the ring is not unscrewed, the chamber cannot be screwed on).
-
Connect the pump to the syringe gun via a hose with locks.
-
Set the pressure regulator to the (-) position.
-
Pump to the required pressure.
-
When the pressure is reached, switch the regulator to “0”, and disconnect the hose.
-
After shooting, repeat the process.
Insert the syringe into the barrel channel from the breech side of the stock.
Close the barrel channel with the ramrod, making sure the stabilizer is not clamped.
D) Safety Precautions
-
Do not use a CO₂ cartridge at temperatures above 60°C.
-
Screw the cartridge on without effort, counterclockwise.
-
Disconnect the cartridge only after completely releasing the gas.
-
Check the safety only when there is no syringe in the barrel.
-
Do not disassemble the trigger mechanism unless necessary.
-
Pressure must not exceed 16 bar.
-
When the syringe gun is not in use, the pressure regulator must be set to (-).
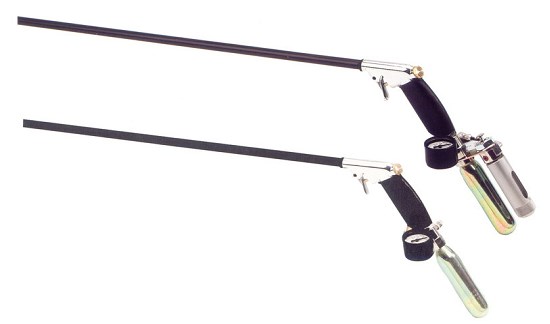
Syringe Guns PI and PI CO₂
General Information:
The syringe guns operate either from a CO₂ cartridge (PI CO₂ model) or from a foot pump (PI model). The effective range of the syringe gun is from 1 to 30 meters.
The CO₂ charging device can be purchased separately for the PI model or as a standalone PI CO₂ model.
A) Loading the PI CO₂ Syringe Gun
-
Unscrew the black casing by turning it counterclockwise.
Attention! Before unscrewing, make sure the cartridge is not under pressure.
-
Ensure the green valve is closed.
-
Insert the CO₂ cartridge neck-first toward the handle, put on the casing, and turn several times until the cartridge is pierced — you will hear a hissing sound.
-
Press the valve button to adjust the pressure. Check the pressure gauge to confirm gas has entered the handle. Adjust pressure using the valve.
Loading the PI Syringe Gun (Using Foot Pump)
-
Connect the pump to the syringe gun handle.
-
Pump until the desired pressure is reached, monitoring the pressure gauge on the syringe gun.
-
Once the required pressure is achieved, the pump can be disconnected.
-
To reduce pressure, open the green valve; to increase, pump more.
-
Insert the syringe into the barrel from the rear side to a depth of 3–4 cm using a pencil, pen, tweezers, or similar.
-
Attach the barrel to the handle. The barrel is held by a rubber ring. If the attachment is loose, replace the ring (a new one is included in the kit).
-
The syringe gun is ready to fire.
Attention! Attach the barrel with the syringe only immediately before firing. Otherwise, store the barrel and handle separately. Pressure in the handle can be maintained indefinitely.
B) Aiming
-
It is recommended to shoot with both hands: one holding the handle, the other supporting the barrel.
-
To improve accuracy, use a support (fence, car door, tree, etc.).
-
Aim at the center along the barrel direction.
Attention!
-
At low pressure, the syringe’s trajectory rises, speed and impact force decrease.
-
At higher pressure, the trajectory lowers, speed and impact force increase.
C) Firing
D) Safety Precautions
-
Do not pump a loaded syringe gun.
-
Do not store the syringe gun under pressure.
-
Maximum allowable pressure is 12 bar.
-
After every 5–6 shots, clean the barrel channel with a clean cloth without lubrication.
-
Prevent dust from entering the handle of the syringe gun.

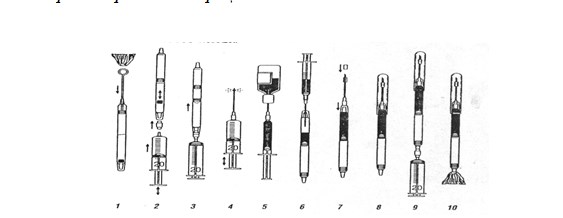
6. Syringes for Syringe Guns
A. Procedure for Loading Syringes
Syringes are supplied under pressure.
-
Detach the stabilizer from the syringe and use a pin to push the pink piston into the syringe base to remove the compressed air.
-
Using a medical syringe with an adapter, push the rubber piston into the chamber for the active substance.
-
With a sharp movement, move the rubber piston of the medical syringe to its extreme rear position.
-
Attach a needle to the medical syringe and check its functionality by passing air through it.
-
Draw the required amount of active substance into the medical syringe.
-
Holding the syringe with the active substance chamber upwards, fill it from the medical syringe with the active substance.
-
Place a rubber clamp on the needle so that it covers both needle openings. Secure the needle firmly on the syringe using pliers.
-
Attach a protective cap (optional).
-
Holding the syringe with the active substance vertically, inject 10–12 ml of air sharply through the tailpiece using the medical syringe with the adapter. The pink piston should move to the position near the tailpiece.
-
Detach the medical syringe and adapter, then fix the stabilizer in place.
These syringes and needles are reusable. It is recommended to rinse the syringe with distilled water after use. Needles can be disinfected and rinsed with clean water. When storing syringes, it is recommended to inject 5–8 ml of air into the active substance chamber.
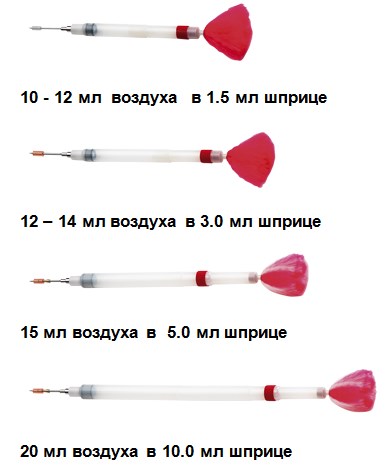
B. Recommended Air Volume in Syringes
C. Safety Measures
-
Do not use syringes with leaks.
-
Do not immerse syringes in boiling water.
-
Do not leave active substance or water in syringes for more than 24–48 hours, as this may cause piston corrosion.
6. Active Substance
Currently, there is a wide variety of medications available for tranquilizing and immobilizing animals. Before use, it is necessary to know the required dosage (depending on the animal’s weight), the mode of action of the active substance, and the possible reaction of the animal to it.
Attention! The effectiveness of the active substance largely depends on:
-
The shooter’s experience and accuracy
-
The animal’s age
-
The health condition and stress level of the animal
-
The animal’s sex
-
Season and climatic conditions
Prohibited:
-
Aiming the syringe gun towards a person.
-
Loading the syringe gun in violation of established rules.
-
Using the syringe gun in crowded places.
RECOMMENDATIONS for the organization and operation of the Dog Control Service
The Dog Control Service is organized to control stray animals in populated areas, as well as to assist other animals and birds living there.
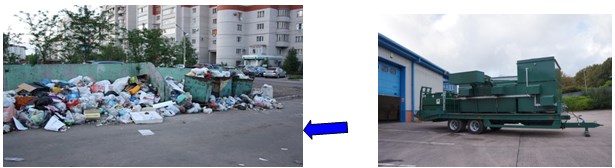
Work related to catching stray and unattended animals includes:
-
Receiving requests and planning routes
-
Preparatory and finishing tasks, including refueling the special vehicle and preparing the dog control specialists’ equipment (canine handlers)
-
Meeting with interested parties: representatives of the customer, fauna specialists, animal guardians, animal protection organizations, etc.
-
Joint departure to the capture site
-
Capturing the stray or unattended animal
-
Placing the animal in a cage
-
Loading into the special vehicle
-
Transport to holding or sterilization facilities
Composition of the dog control specialist team:
When capturing stray and unattended animals using tranquilization:
-
Driver-specialist in dog control — 1 person
-
Dog control specialist — veterinarian — 1 person
-
Dog control specialist — canine handler — 1 person
When capturing without tranquilization (with participation of animal guardians, animal protection organizations, etc.):
Equipment of the dog control specialist team:
-
Vehicle — 1 unit
-
Syringe gun PI set — 1 unit
-
Capture device 109-307-60 — 1 unit
-
Capture device 109-307-28 — 1 unit
-
Capture net 174-311 — 1 unit
-
Cat and feline restraint device — 1 unit
-
Rabies gloves — 2–3 pairs
-
Ultrasonic repeller — 1 unit
-
Net thrower — 1 unit
-
Cage trap — 1 unit
-
Protective suit for dog control specialists — 1–2 sets
-
Animal transport stretcher — 1 unit
Clothing requirements for stray and unattended animal capture:
-
Cotton suit
-
In winter additionally: jacket with insulated lining, cotton pants with insulated lining
-
Reflective stripe applied on pants
-
The name and phone number of the capturing organization clearly displayed on the back of the suit and jacket
8. Introductory Meetings and Their Decisions
To prepare dog control specialists, it is recommended to periodically hold “briefings” to correctly assess the situation and choose the appropriate capture method.